cry of fear команды читы консольные
Cry of fear команды читы консольные
Неожидал встретить тебя на этом казалось бы интересном руководстве
Ты наверное хочешь узнать про какие крутые консольные команды я написал в названии руководства?
Ну чтож. Мотай вниз и читай, и удачного просмотра 🙂
In this guide, I have collected cool, in my opinion, console commands that not many people could use because it is difficult for a person to find a specific command in the console, but not for me 🙂
Before viewing the manual The author of the manual, namely!
It does not have a complete list of commands, but only a part of it; in the manual, the commands may not be fully formed correctly! they will be denoted ERR
And this is a fact!
В этом руководстве я собрал крутые по моему мнению консольные команды которые не многие могли бы использовать т.к находить в консоли определённую команду для человека это трудно но только не для меня 🙂
Перед просмотром руководства Автор руководства а именно!
Не имеет полного списка команд а лишь его часть, в руководстве возможно не до конца правильно оформленны команды! они будут обозначаться ERR
Для начала советую вам запомнить значения для команд, чтобы в будущем вы не запутались
К слову. Все разделы как и все команды идут от А до Я (По алфавиту).
ТАК ЖЕ!
Специально для RU Community и может быть для EN Community От автора руководства
Специальный бинд для более нужных командах из этого списка
bind «p» «net_graph 3; net_graphwidth 1000; graphheight 925; cl_showfps 1; r_novis 1; developer 1; fps_max 144; cl_showerror 1; net_log 1; bump_vecs 1; bump_debug 1; gl_decalstatus 1»
Примечание! : Если вы не играете на разрешении 1920х1080 то прошу вас поменять некоторые значения команд на ваши настройки экрана игры
Это наверное самый распространённый способ среди знающих консольщиков
Заменой значений в файле skill.cfg.
Но так же это можно сделать и в игре.Только на этот раз сохраняться значения не будут после выхода из игры!
Немного информации по консольной команде.
Пример:
Хочу чтобы я убивал врагов с 1-го удара кулака.
Играю на сложности DIFFICULT (у неё значение 3)
sk_cof_punch3 (значение урона)
Играю на сложности NIGHTMARE (у неё значение 4)
sk_baby_damage4 (значение урона от врага)
SAME!
Especially for RU Community and maybe for EN Community From the author of the guide.
Special bind for more needed commands from this list
bind «p» «net_graph 3; net_graphwidth 1000; graphheight 925; cl_showfps 1; r_novis 1; developer 1; fps_max 144; cl_showerror 1; net_log 1; bump_vecs 1; bump_debug 1; gl_decalstatus 1»
Example: By the way, your resolution is 1024×768, you change in the bind*+Enable*instead of net_graphheight 1000 to 551, and grappheight instead of 925 by 640.
This is probably the most common method among knowledgeable console players.
Replacing the values in the skill.cfg file.
But this can also be done in the game. Only this time the values will not be saved after exiting the game!
Some information on the console command.
Example:
I want to kill enemies with the first blow of my fist.
I play on DIFFICULT difficulty (it has a value of 3)
sk_cof_punch3 (damage value)
I play on NIGHTMARE difficulty (it has a value of 4)
sk_baby_damage4 (enemy damage value)
Cry of Fear — все команды для функции HUD-FOV-Walk в игре
Можно играть в Cry of Fear без прицела или полосок выносливости, здоровья и боеприпасов, что делает игру более уязвимой и атмосферной. Попробуйте, когда вы уже знакомы с игрой, или во время второго прохождения.
Команды
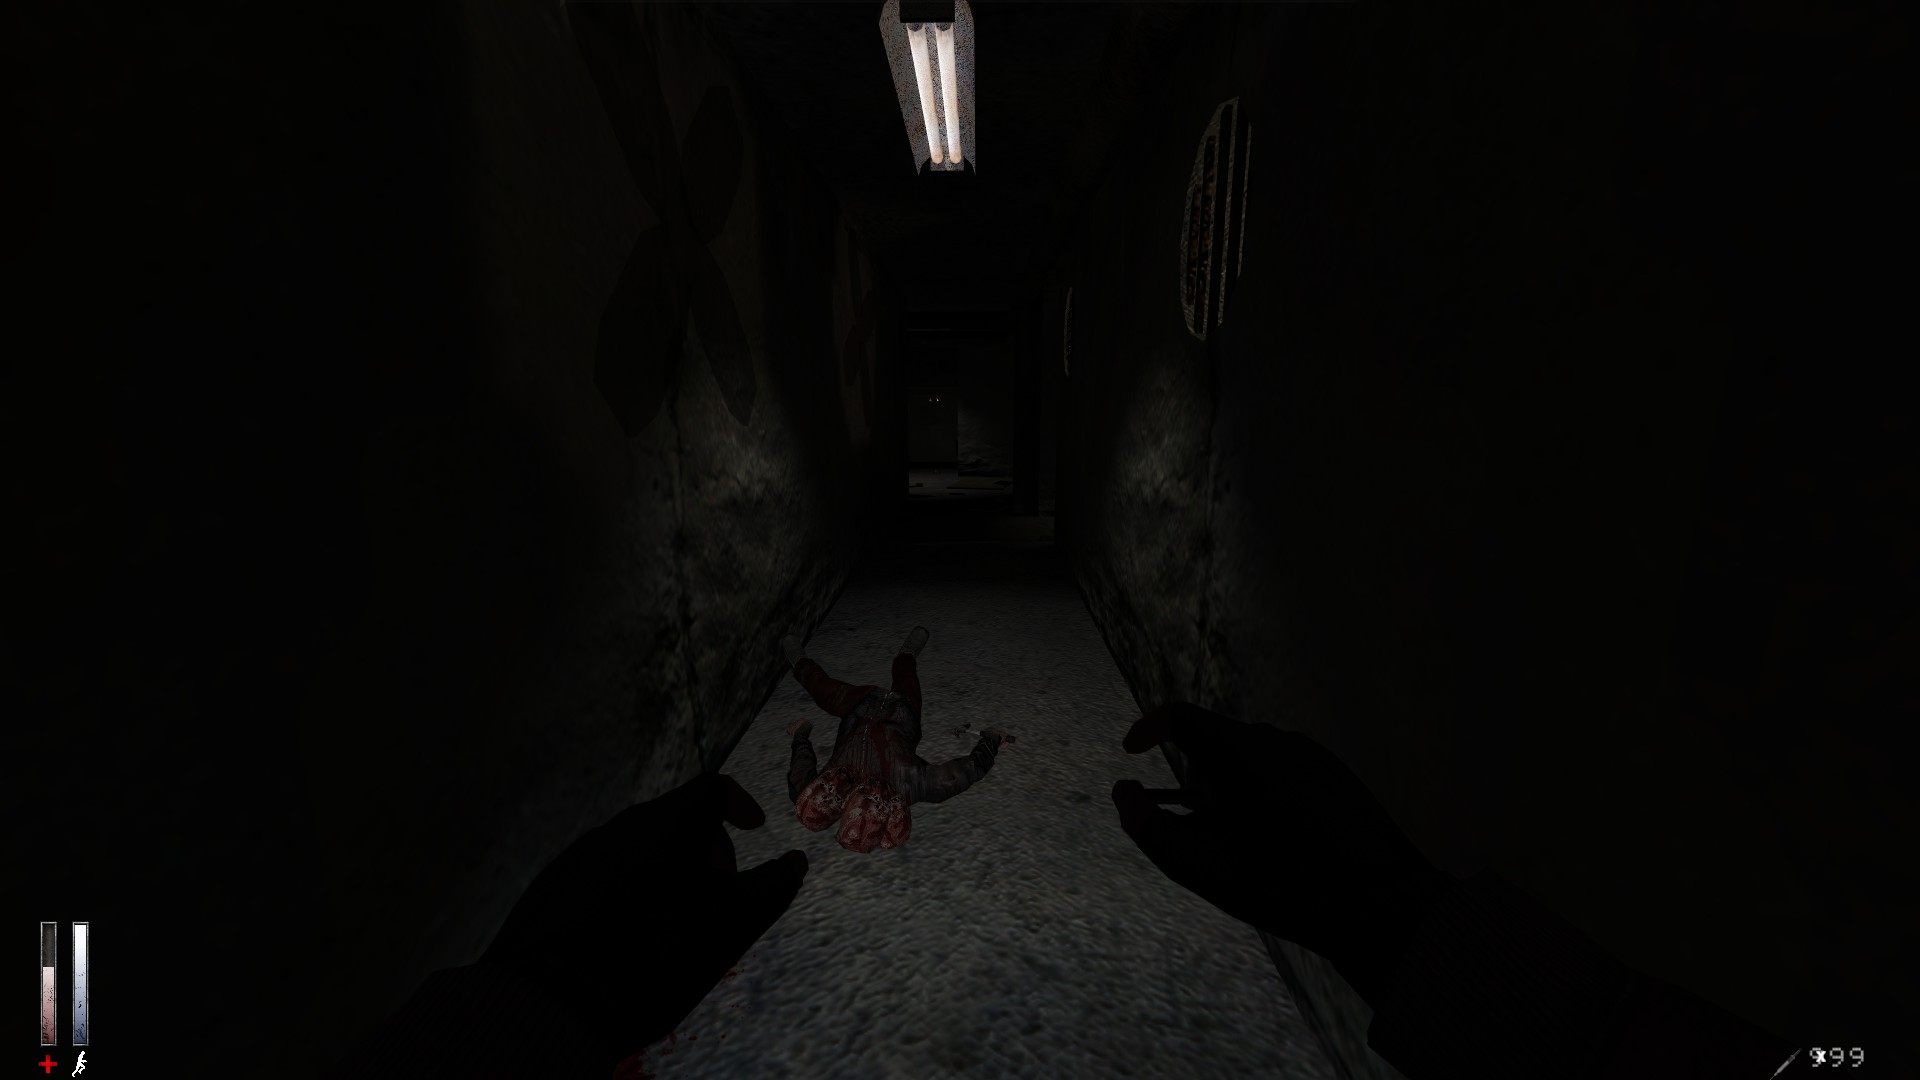
Смотрите скриншоты ниже, чтобы увидеть результат
cl_fovmultiplier x — измените поле зрения. Замените x числом от 1,2 до 1,25.
(Эти значения лучше всего подходят для разрешения 1920 × 1080, вы можете добавить любое значение выше 1,0, которое будет комфортно)
К сожалению, Cry of Fear не имеет функции ходьбы по умолчанию, но мы можем использовать команды для уменьшения и восстановления скорости по умолчанию, достигая той же цели.
(Эти команды заменяют функцию уклонения / уклонения по умолчанию; вам следует либо повторно привязать клавишу уклонения в параметрах, либо использовать другую клавишу вместо «alt»)
Отключите эффект зернистости экрана и размытие экрана, оба из которых находятся в параметрах> расширенные параметры
Hudless Скриншоты
Мир, к которому вы не готовы
Надеюсь, вам понравится публикация Cry of Fear: все команды для функции HUD-FOV-Walk в игре. Если вы считаете, что мы должны обновить публикацию или что-то не так, сообщите нам об этом в комментариях, и мы исправим это как можно быстрее! Спасибо Вам и хорошего дня!
Все хитрости игры
В каждой игре есть свои хитрости, фичи или баги. Конечно это не обошло и Cry of Fear. В самой игре багов полным полно, но мы будем говорить о хитростях в игре. Они помогут вам пройти игру без проблем.
2) Если вы собираетесь получить автомат FAMAS или книгу (для этого надо пройти игру на сложности «Кошмар», что крайне тяжело) и при прохождении на сложности «Кошмар» сохраняться только пятью кассетами, то можете смело их выкинуть, так как перед сохранением можно просто ввести в консоли команду «difficulity 1» (без кавычек) и игра станет «лёгкой», после чего её можно пройти без особых напрягов. Для получения книги плёнку придётся оставить, мало ли, а вот если вы за FAMAS’ом, то сохраняйтесь сколько хотите. Проверено. А коли вы не можете без сохранений, то вы можете написать в консоли «save (ваше имя в кооперативе)» и отправить (без кавычек), а чтобы загрузить напишите «load (ваше имя в кооперативе) и отправляете, либо просто нажмите на F5, чтобы сохраниться, а F6 — чтобы загрузиться.
3) В лесу, на той локации, где нужно вставить дверную ручку в дверь лачуги, можно избежать встречи с Бегуном с Бензопилой. Достаточно просто подобрать дверную ручку, не наступая на дощечку со стрелкой.
3) Есть способ забагать монстров. Когда вы спровоцируете монстров на себя, выходите из локации и заходите обратно. Они будут стоять на одном месте. Только не подходите к ним. На монстрах с кроватями это не работает. На новых версиях игры это проверялось, в «Доктор Моде» работало безотказно.
5) Разработчики убрали возможность изменить яркость в игре обычным способом, используя ползунок. Значение яркости попросту сбросится на уровень по умолчанию. Чтобы установить максимальную яркость в игре и она не сбрасывалась, зайдите в дополнительные (продвинутые) настройки игры и установите значение яркости на 0.300000, что будет максимумом. Это позволит играть без помощи фонарика. Если вы увидите в игре странного цвета текстуры, не переживайте, это всё из-за яркости, ведь игра предназначена для тёмного окружения, чтобы пользоваться освещением.
6) В интернете есть таблица для Cheat Engine на игру версии 1.6. Подробнее об её использовании и функциях читайте в архиве с таблицей. Она даёт бессмертие, убийство одним ударом, стрельбу без перезарядки и бесконечную выносливость.
На сумке Саймона изображены названия групп «Kult» и «Megadeth». «Kult» является рок-группой, сформированной в Польше в 1982 году. «Megadeth» является хэви-метал группой, сформированной в 1983 году. Также на его сумке изображён древний символ, называемый «Triquetra Reiki», который изображает всевозможные исторические предпосылки.
3) Счастливый Саймон
В колледже есть кафетерий, который называется «Glada Simons café», что переводится как «Кафе Счастливого Саймона» (Happy Simon’s café).
4) Мобильник Саймона
Мобильным телефоном Саймона является Sony Ericsson W610i. Имя главного героя также очень созвучно с маркой данного девайса.
С мобильного телефона Саймона можно позвонить на номер 911 и услышать жуткие звуки. Такой же эффект будет от звонка по номеру 112. Номер 911 используется спасательными службами Америки, тогда как 112 является номером спасательных служб европейских стран, в том числе и России.
6) Отсылки на плакатах
— На плакатах в комнате Саймона есть отсылки к игре Half-Life, а также к фильму «Проклятие 2».
— В одной из комнат апартаментов (здания с бензопильщиком из 1-й главы) можно найти плакат «Scarface», на котором изображён Тони Монтана. Эту комнату можно найти на 3-м этаже.
— В апартаментах также можно найти плакат фирмы «Atari».
— В учебном заведении, в столовой возле одного из окна шторкой прикрыт плакат с сидящей на камне посреди моря девушкой, очень похожей на Ариэль из экранизации Disney одноимённой книги «Русалочка» (англ. The Little Mermaid, в дословном переводе — «Маленькая морская дева») Ганса Христиана Андерсона.
7) Логин и пароль — отсылки к AoM
Во время поиска логина и пароля для компьютера, на найденных листах могут появиться такие надписи как «jillanddavid», «leatherhoff45» и др., что является отсылкой к игре Afraid of Monsters.
8) Скорбящий Саймон
9) Саймон, пишущий книгу
Когда у Саймона в метро начинается психоз (в том месте, где надо проломить кирпичную стену), войдите в жёлтую дверь, а потом идите обратно через эту же дверь (при этом вы будете слышать, как кто-то ускоренно пишет позади вас). Вы будете огорожены решёткой, а в дали будет сидеть Саймон-инвалид, который пишет книгу.
Tricks Tips and Cheats
Contents
Introduction
WARNING: The use of some of these tricks, tips, and cheats might seriously ruin the immersive value of the game. It’s not recommended to use them on your first playthrough. Play the game, finish the game, and enjoy it for what it is the first time you play it. Some of these tricks also make use of unintended flaws in the game, and involve modifications to settings, and as such Team Psykskallar may deny you support.
Unlimited Ammo/Clips/Items
To start off with you will need to download cheat engine. You can get it here (warning: the installer contains adware, please choose carefully when you install the application).
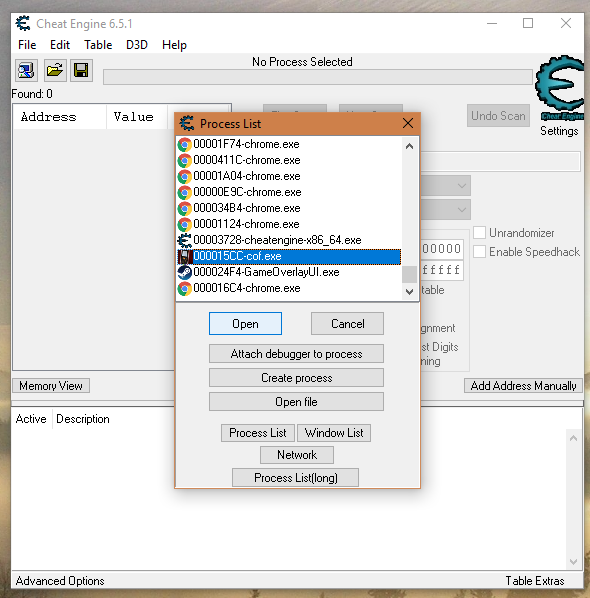
Open cheat engine, and select the open process button (the button in the top right corner that looks like a computer screen with a magnifying glass). Select «cof.exe» from the list of processes and press open. Now follow the instructions below depending on what cheat it is you want to achieve. This stage must be performed regardless of the cheat you want to use.
Warning: Memory values reset after a map change, so if you wish to use these cheats, you’ll need to complete it before you move to another map, if you move to another map, start over.
Unlimited Bullets In Clip (No Reload):
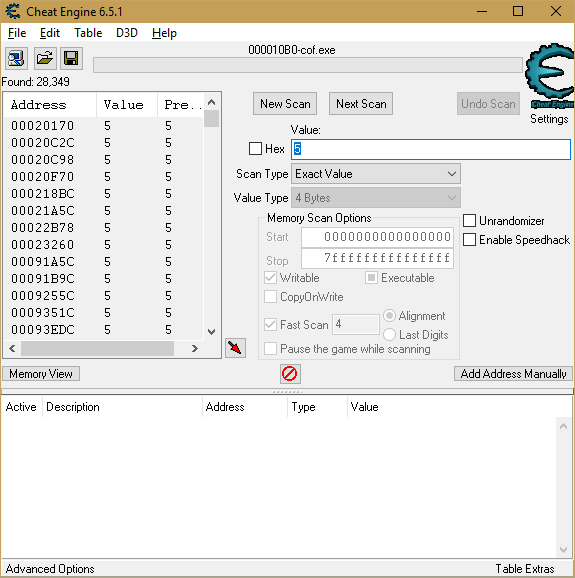
This cheat will essentially give you a clip that contains unlimited ammunition (you’ll be able to fire an infinite number of shots without reloading or running out of ammunition). For starters you’ll need to know how much ammunition the clip of the gun you want to use the cheat on holds. You can find out on our list of weapons. Switch to the weapon you wish to use the cheat on, and ensure it has a full clip (for this example we will use the Taurus Revolver which has a 5 bullet clip). Alt+tab out of the game to cheat engine.
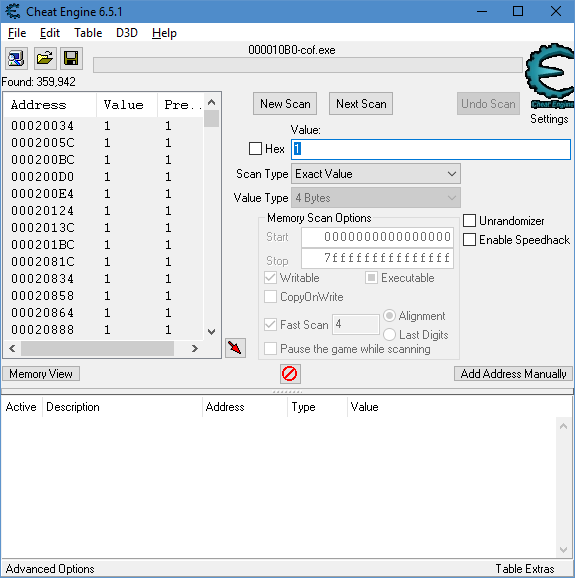
Enter the number of bullets in the clip into the search box, and press search, keep Cheat Engine’s values at their defaults (scan type as exact value, value type 4 bytes)
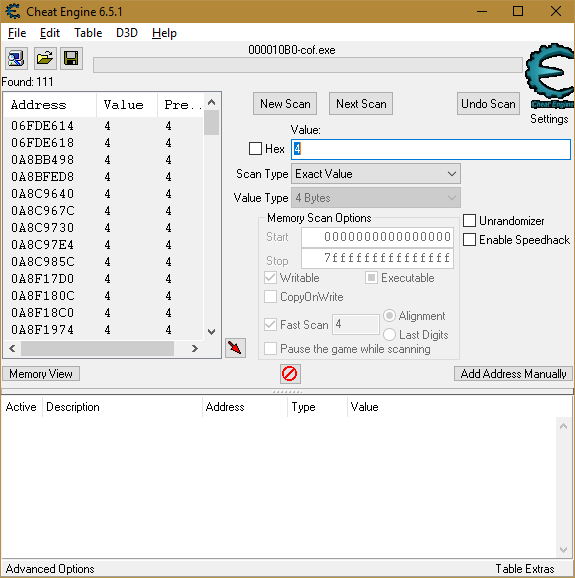
Now go back into the game and fire a shot, then pause the game and alt+tab to cheat engine. Now subtract 1 from the value in the search box and press «next scan»
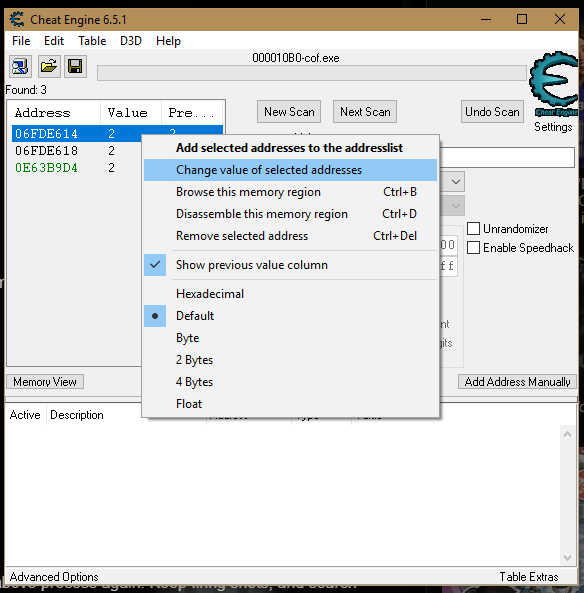
Alt+tab back into the game, fire another shot, then repeat the above process again. Keep firing shots, and search subtracting 1 from the previous value. Carry on until there only 3 numbers left in the address window. Right click on the uppermost of the 3 remaining numbers
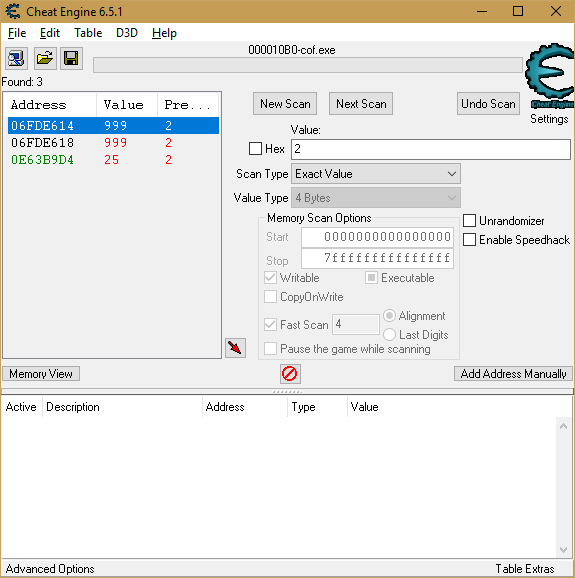
Select «change value of selected address» and set it to «999». The remaining addresses should now show 999, 999, and 25
Now, when you go back into the game, the magazine of the gun you’re using will appear to be empty, however it can still be fired. If so, congratulations, you performed the cheat properly.
Warning: if you reload the gun, it will reset itself and you’ll no longer have an infinite clip. Don’t reload the gun if you want the effect to remain.
Unlimited Bullets / Syringes:
The procedure is similar to the procedure above. If you want the challenge of reloading to remain, but want to give yourself unlimited ammunition (similar to the Famas), equip the weapon you want to achieve the effect on and note how many clips you currently have for it (if you’re looking to do it with syringes, equip the syringe and note how many you’re carrying).
Note: This cheat will not work on weapons that require clips, it will only work on weapons that use bullets, such as the Revolver and Shotgun.
Open cheat engine as detailed above. For this example the cheat will be performed with syringes.
Warning: This cheat will make it practically impossible to clear the slot that the syringes occupy in your inventory, so be sure to use your inventory wisely.
Search for the opening value in cheat engine
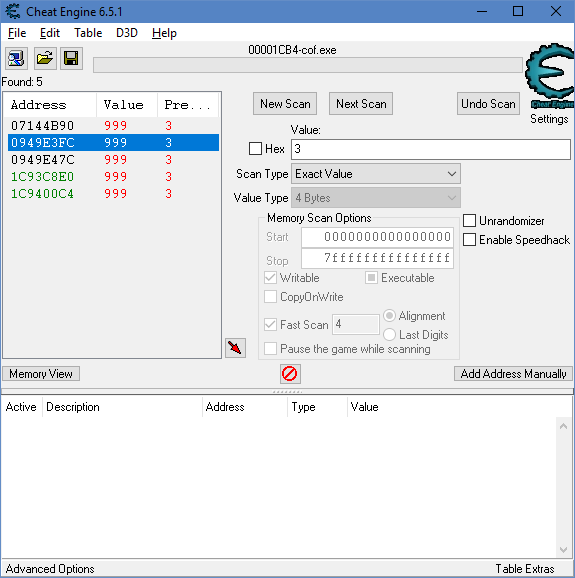
Now pick up another, or use one either by reloading, or injecting if it’s a syringe (warning: don’t use your last syringe). Then alt+tab out of the game and enter the new amount in the search box, and press next scan. Go back to the game and pick up or use another. As above, keep repeating this process until you’re left with 5 numbers. Go through them 1 by 1, and right click on them and change them to «999». Eventually, when you change one, all the rest of addresses will change to 999. When this happens, the cheat will have worked properly.
Now go back to the game. You will now see that you have 999 syringes / clips available (if this later changes to 254, don’t worry).
Using Doors Through Walls
Due to a known design feature of the goldsource engine upon which Cry Of Fear is built, in some places it is possible to use various items such as tape recorders and doors through walls. This will allow the player to skip some areas entirely, and speed up progress through the game.
Apartments: there are 4 occasions on which this trick can be used in the apartments. The first is when you climb the scaffolding to access the apartments. It is possible to use the door to enter floor 3 without climbing up the ladders. instead of using the ladder, jump across to the window box, and you can use the entrance through the ceiling. The second is when Simon first arrives on the second floor, and needs to obtain the hall door key to head towards the first floor elevator. It is possible to use the third floor door through the ceiling and bypass both the scene where Simon is locked in the room with the photos of the predator’s victims, and the sequence in which the Glock 19 and hall key are retrieved from the corpse. WARNING: as this bypasses the scene with the corpse, it will also prevent the player from acquiring the Glock, so it’s only recommended to do this if you have access to unlock weapons.
The other places this can be used are in the basement. Upon coming out of the basement after retrieving the tape with the elevator code (when you return to the flats it can also be used after acquiring the ladder from the now flooded basement), upon going up the stairs and leaving the basement, instead of using the door to floor 1, it is in fact possible through going up the first 3 stairs to use the door to floor 2 through the ceiling, cutting a significant chunk out of the travel.
Waspet Gardens: After you have dug up and acquired the key to the apartments and entered them, when you come face to face with the apartment on the first floor, it is possible to jump up and use the door to the apartment that grants access to the roof through the ceiling.
Skipping Syringe Animations
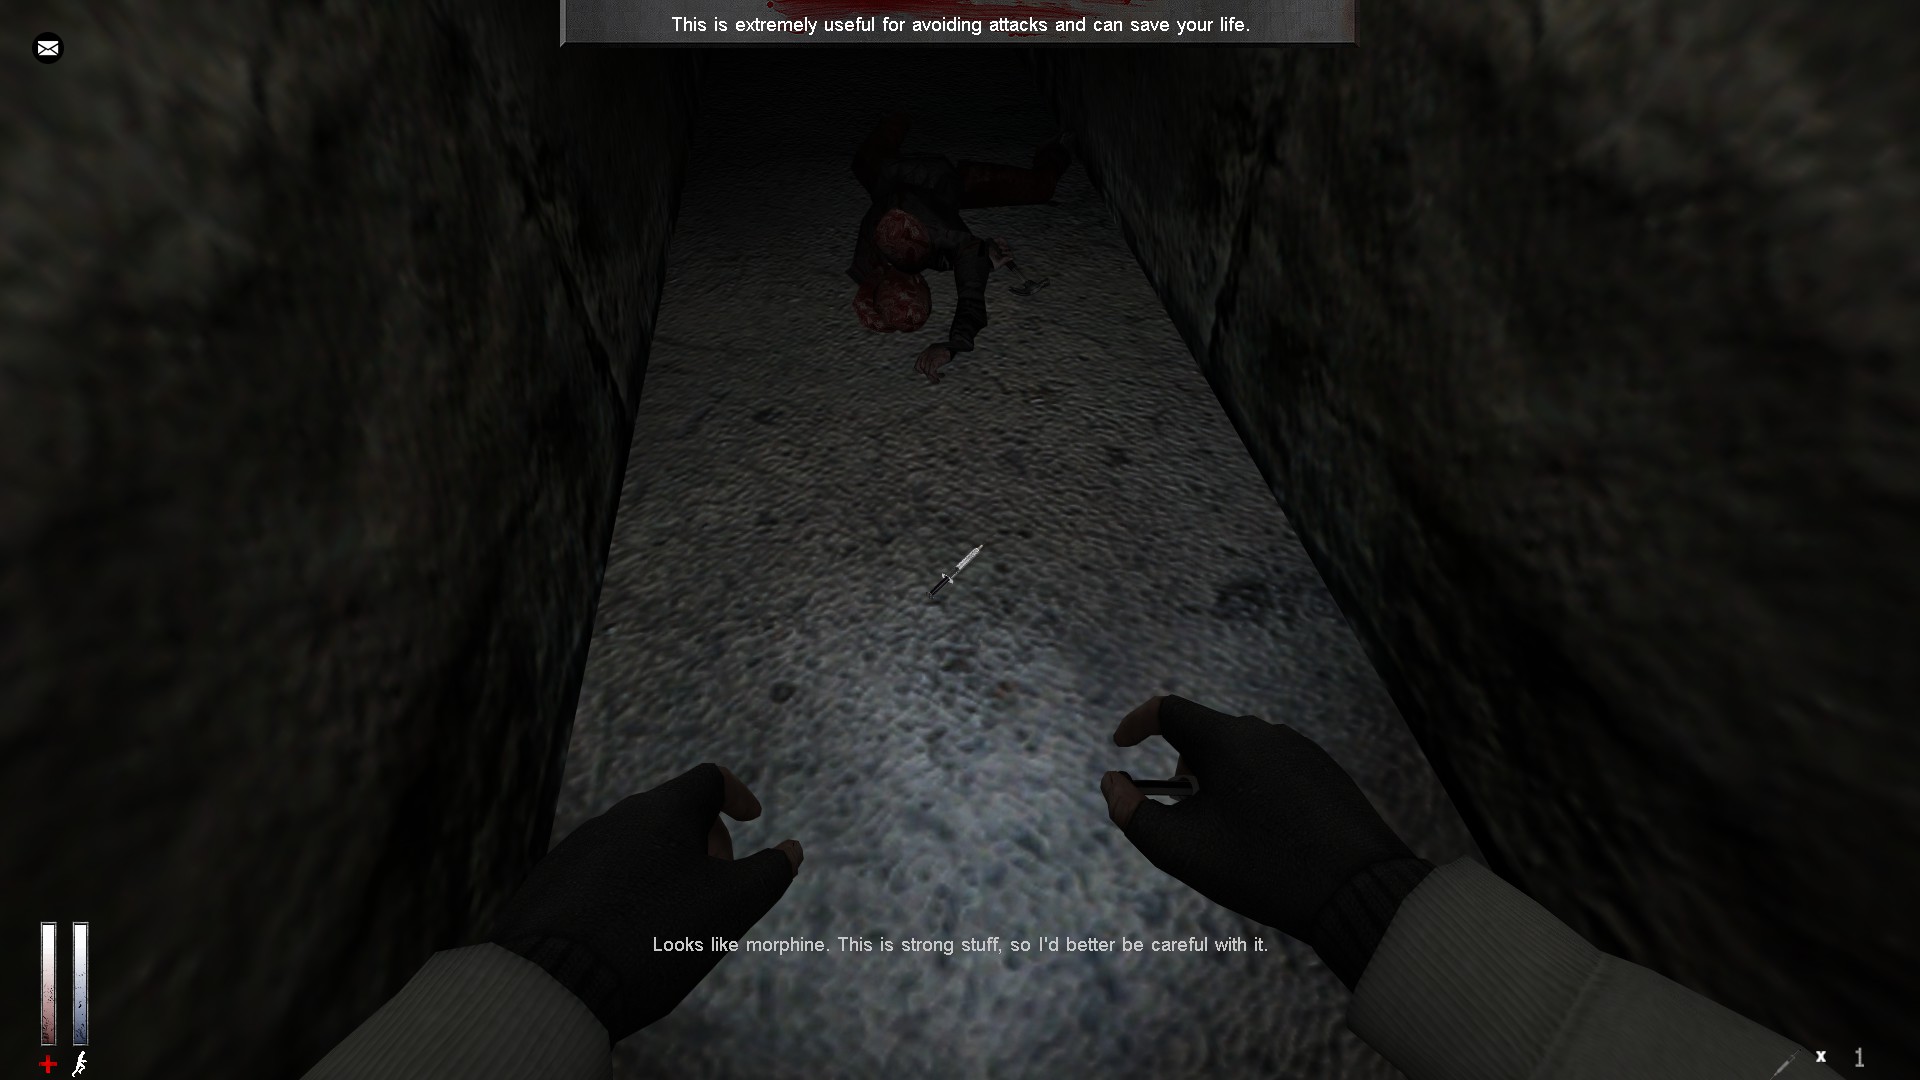
If the player stands next to a door, uses a syringe, then immediately walks through the door, the player will be healed without them having to watch the usual animation, which will save several seconds in time.
Mace Battle: Jumping To Avoid Shock
During the battle with mace, it is actually possible to avoid being damaged by the electric shocks without heading towards the platform. If you stay standing in the water, you’ll hear the electricity charging, and if you jump just as it’s about to discharge you will avoid taking damage as long as you time the jump properly.
Disabling Black & White Permanently
Unfortunately it isn’t possible to fully disable this setting in game, as for some reason the game changes it back again the next time you launch the application. However through a mod to a configuration file, it is possible to disable black and white mode permanently.
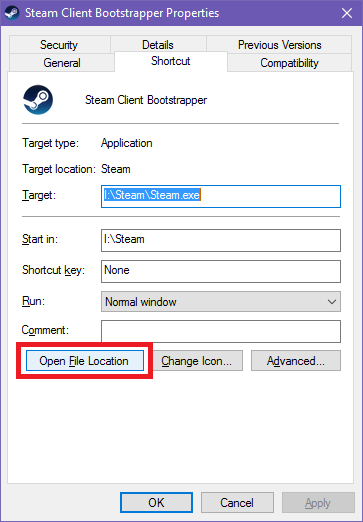
1: Navigate to your Steam folder (if you’re unsure how to find it, right click your Steam icon, select properties, and go to the «shortcut» tab, and click «open file location»)
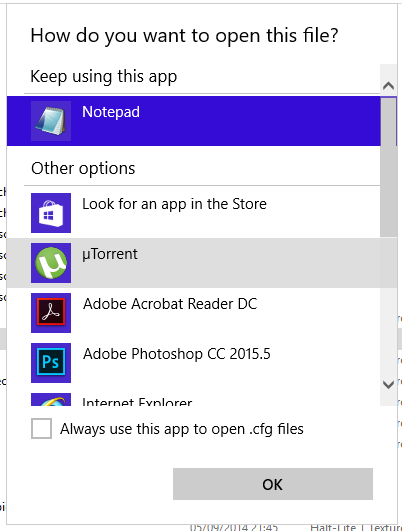
2: Navigate to «SteamApps\common\Cry Of Fear\cryoffear», and open «autoexec.cfg». You be presented with a dialogue asking you what application you wish to open the file with. Select notepad from the list and press OK.
3: Add the following into a new line: gl_posteffects «0»
4: Close and save the file. From now on, whenever you launch the game black and white effect will be disabled in cutscenes and nightmare sequences
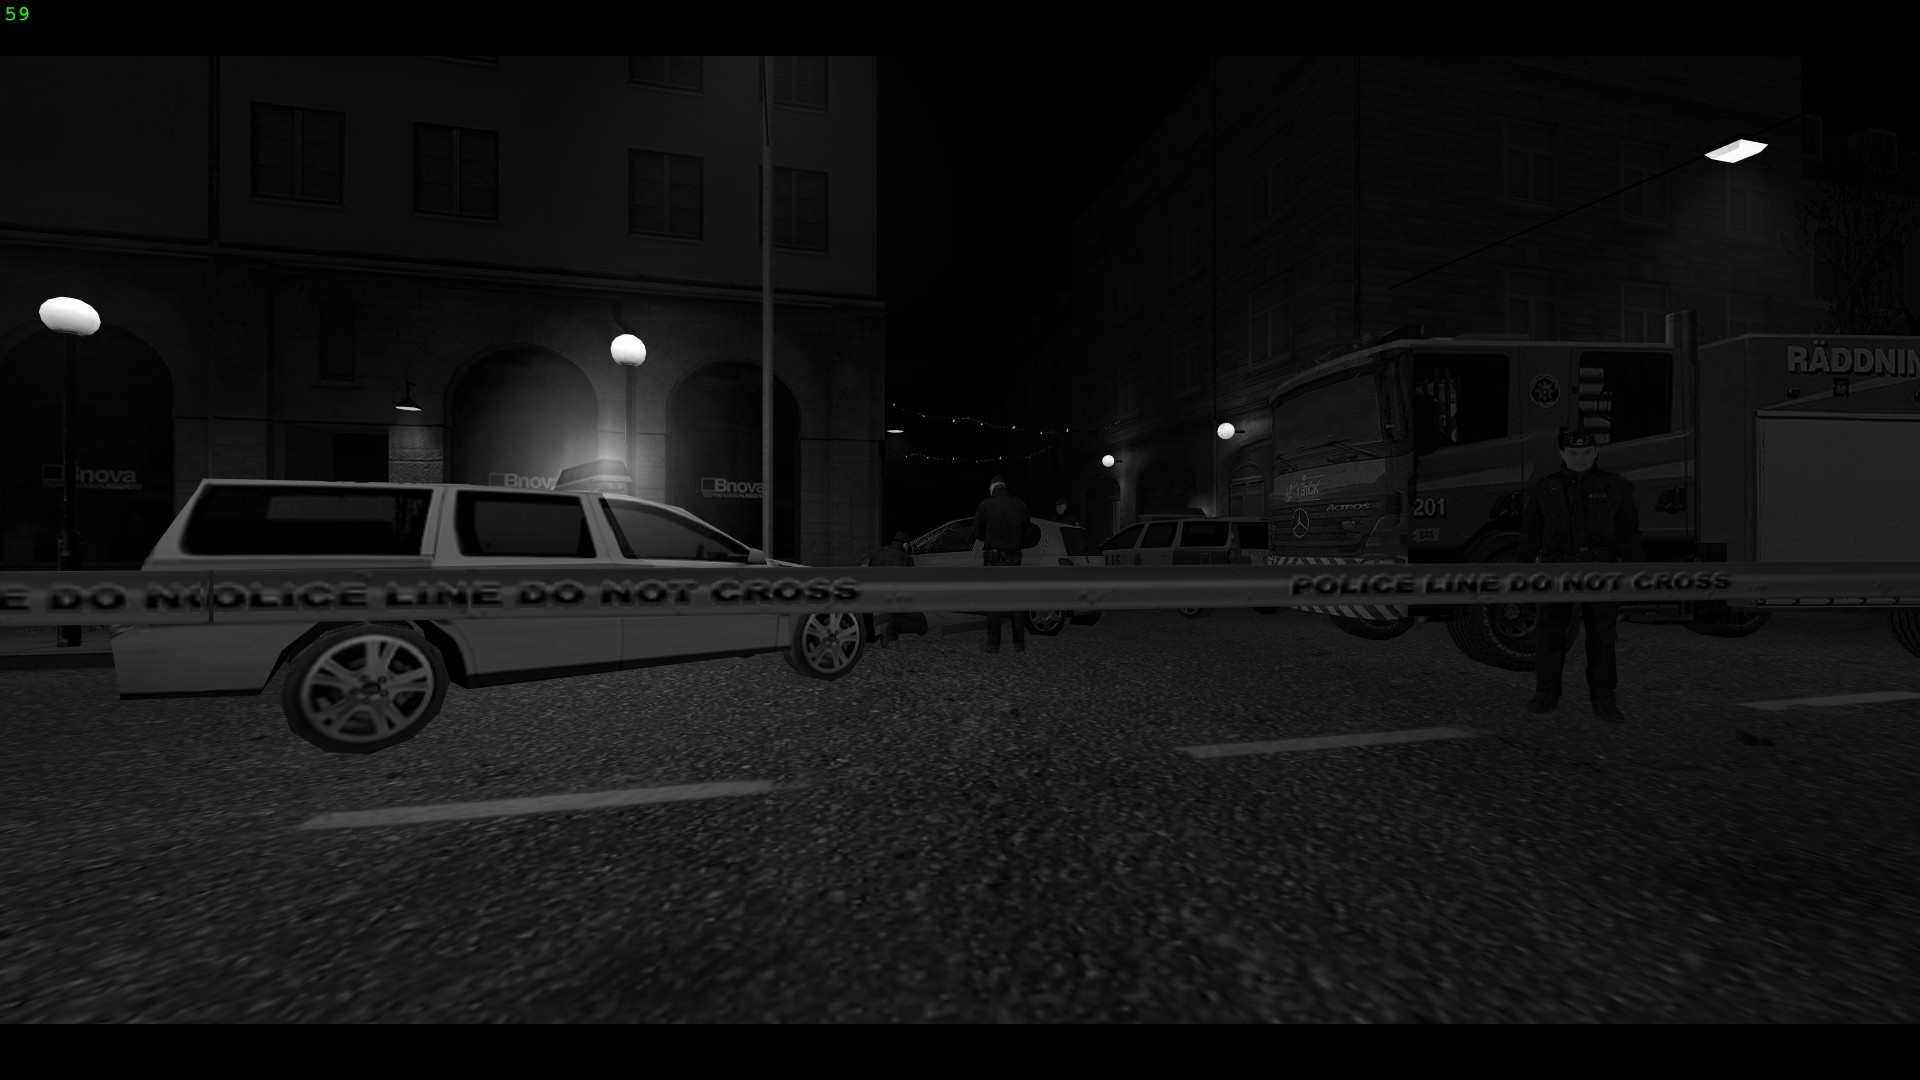
Black And White Enabled
Black And White Disabled
Changing Field Of Vision
Team Psykskallar have removed the usual command to change the field of vision in the game, however it is still possible to change it through a console command. Simply bring down the console using the «¬» key, and enter cl_fovmultiplier x (x being the number you want to enter. 1 is the default, 1.1 or 1.2 work best on most widescreen monitors).
WARNING: Setting this value too high will distort the game visually
FOV increased by 20% (multiplier 1.2)
Switching Weapons With Mouse Wheel
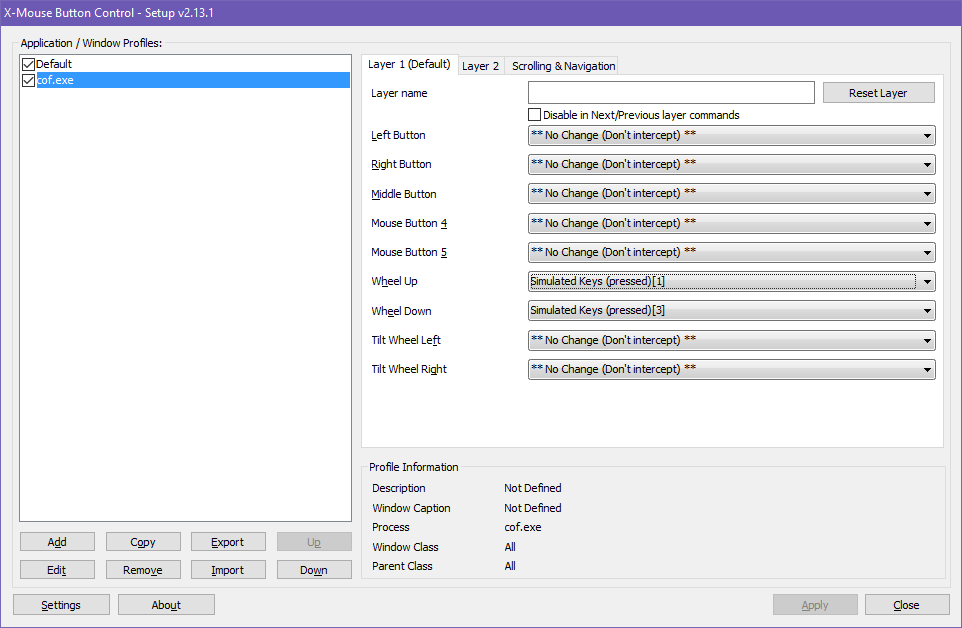
Under normal circumstances it’s impossible within the game to switch weapons using the mouse wheel, a feature the developers removed to force players to use quickslots, however it is still possible to do with third party software.
1: Download and install X Mouse Button Control from here
2: Add a profile for Cry Of Fear. Simply press add, use the option to browse for the EXE, navigate to «/steam/SteamApps/Cry Of Fear» and add cof.exe
3: Select cof.exe from the list, and under «Wheel Up» select «Simulated Keys» from the drop down menu. Enter «1» and press OK
4: Now do the same for «Wheel Down», and assign it to either number 2 or 3.
5: When you’re in game, assign the 2 weapons you use most frequently to the quickslot numbers you mapped out in steps 3 and 4. You should now be able to switch between them using the mouse wheel.
High Process Priority & Performance Tweaks
It has been reported by some users on the Cry of Fear forums that forcing the game into high priority mode resolves various issues with lag that some players experience. Depending on your graphics card maker, there are several ways this can be accomplished.
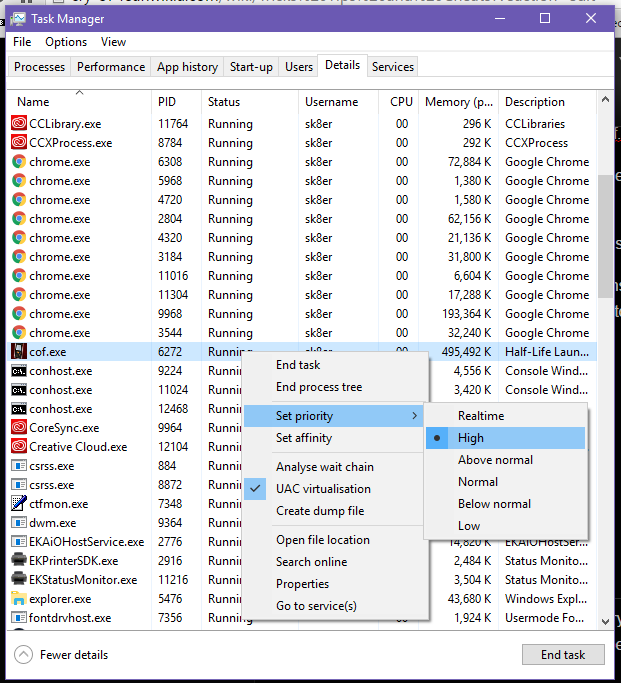
General: With Windows Task Manager (AMD, Intel & nVidia)
1: Once you have launched the game and the main menu is loaded, press the windows key on your keyboard to minimise the game.
2: Right click an empty area of the task bar and select «Task Manager».
3: If you’re using Windows 8, 8.1, or 10 select the «Details» tab. If you’re using Windows XP, Vista, or 7, select the «Processes» tab of task manager.
4: Locate «cof.exe» on the processes list. Right click it, select «set priority» and select high
5: Go back to the game
NOTE: You will have to do this every time you launch the game.
RadeonPro (AMD users only)
RadeonPro is a piece of software for users of AMD graphics cards, allowing them to use automated profiles for games.
1: Download and install RadeonPro from here
2: Add a profile for Cry Of Fear by clicking the new profile icon (shown below). Navigate to your Cry of Fear folder and add cof.exe
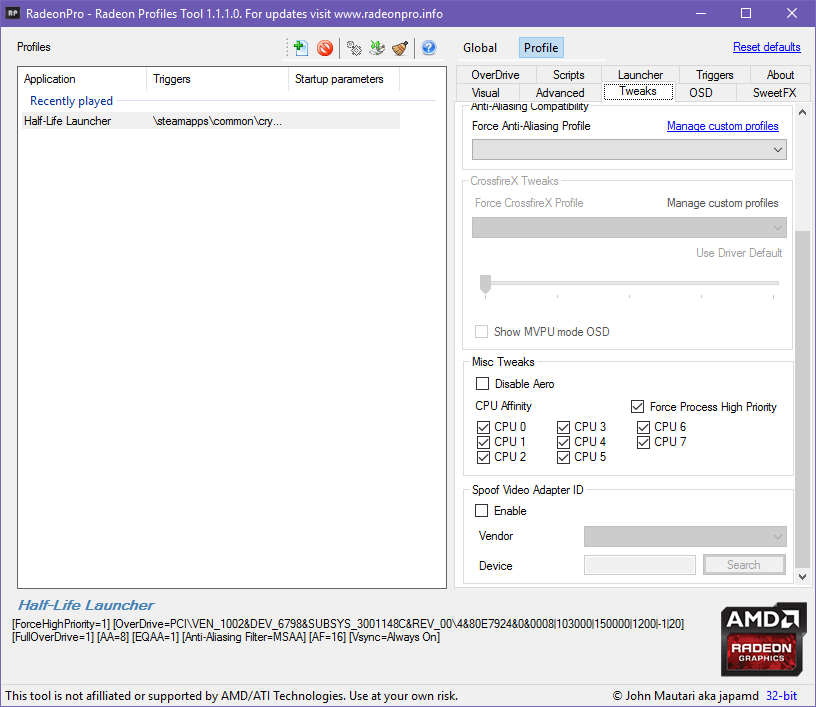
3: Cry Of Fear will appear on the list as «Half Life Launcher». Highlight the entry with your mouse, and select the «Tweaks» tab. Scroll down to «Misc Tweaks» and tick «Force Process High Priority».
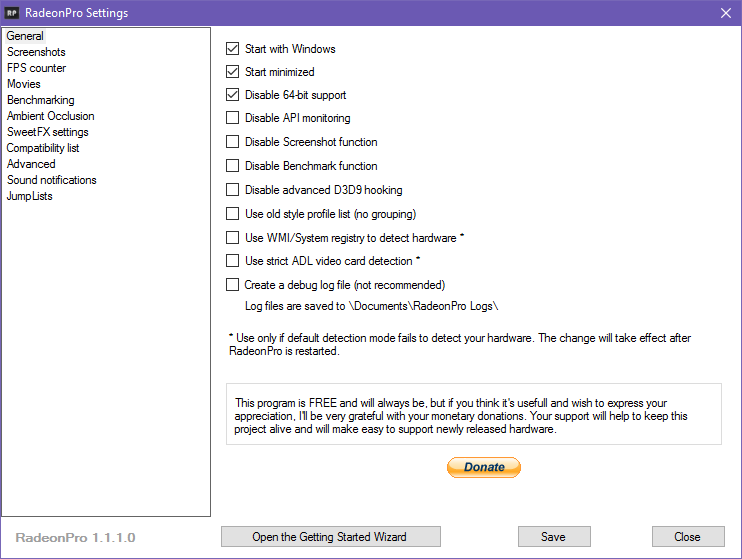
4: Additionally, it’s recommended to have RadeonPro run on system startup so it can properly automate game settings so, additionally, go into the program’s settings (cog icon on the bar) and under general tick «Start With Windows» and «Start Minimised» (if you don’t want an annoying message box every time you boot, it’s also recommended to tick «Disable 64 bit support».
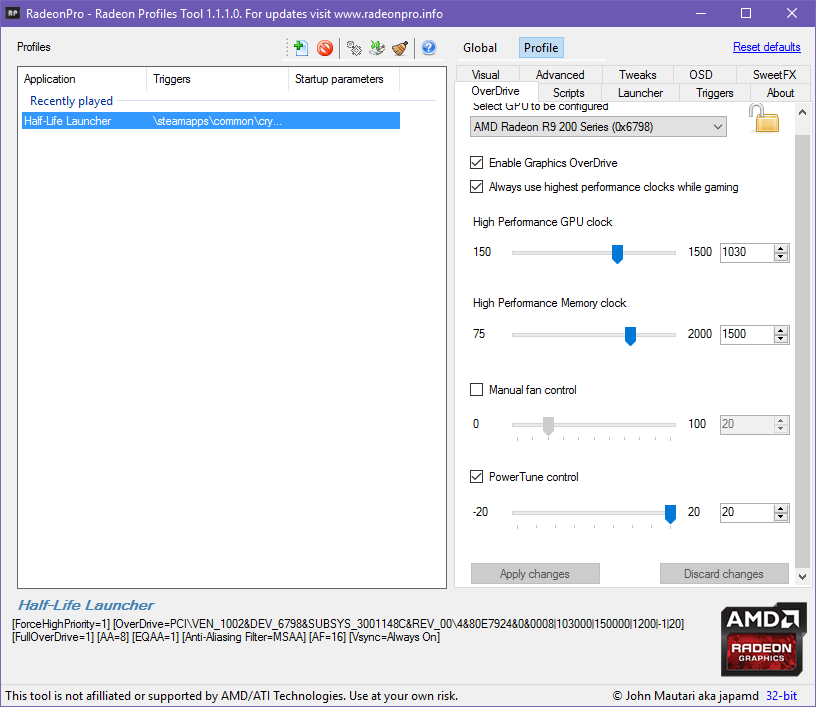
5: Although this step is optional, it may further boost performance to always force your GPU to operate at its full clock speed, to prevent the clock speed from fluctuating during gameplay and reducing potential lag. To do this, access the «Overdrive» tab (you’ll need to click the padlock icon to unlock overdrive mode). Tick «Enable Graphics Overdrive» and «Always Use Highest Performance Clocks While Gaming». Then scroll to the bottom and apply changes.
If any users are familiar with software similar to RadeonPro that would also work with nVidia cards, feel free to add instructions to this section
Cheats
Although, when the team released Cry Of Fear on Steam as a standalone they took most of the game’s cheats out, it is still possible to alter some of the game’s client variables to cheat in various ways.
Warning: Team Psykskallar did not intend for cheats to be used in Cry of Fear, and you may be denied support if you choose to use cheats
Firstly, you’ll need to add a couple of things to your autoexec file. So locate and edit your autoexec.cfg file (as directed above, in the Disabling Black And White section), and add the following variables (each on a separate line):
Movement Speed:
This will allow you to alter the character’s forward movement speed in game (works for walking forwards, sprinting, and swimming). This process will involve binding commands to keys, so make sure that the keys you want to use aren’t already in use for other commands.
Bring down the console with «¬» or «
» and enter the following commands (replace X and Y with whatever keys you want to use)
bind x «cl_forwardspeed 999»
bind y «cl_forwardspeed 300»
If you enter the commands correctly, pressing X will speed up the character’s forward movement by around 333% (3.3x as fast), allowing you to cover large distances quickly, and pressing Y will return movement speed to normal. This will allow you to progress through the game and cover large areas more quickly. Particularly useful for swimming sections and backtracking sections
Gravity:
Bring down the console with «¬» or «
» and enter the following commands:
bind x «sv_gravity 800»
bind z «sv_gravity 100»
Pressing Y will be particularly useful for skipping extra long ladders, and pressing Z will be useful for shorter ladders, and obstacles. Once you’ve dodged your obstacle x will return the gravity level to normal
Brightness:
Changing the in game brightness will make it easier to navigate some darker areas, and although this setting can be changed from inside the game’s menu, you can also assign key commands to change this setting on the fly without entering the game’s menu, which will save a lot of time. As above replace X and Y with whatever keys you wish to use
Bring down the console with «¬» or «
» and enter the following commands:
bind x «gl_brightness 0.300000»
bind y «gl_brightness 0.000000» thank
Pressing X will increase the game’s brightness boost to the highest available value, and pressing Y will return it to normal.
Additional Information
This page will stay open for editing (at admin discretion), if the wiki’s readers find any more useful tips or tricks, they are welcome to add them to the article.


